
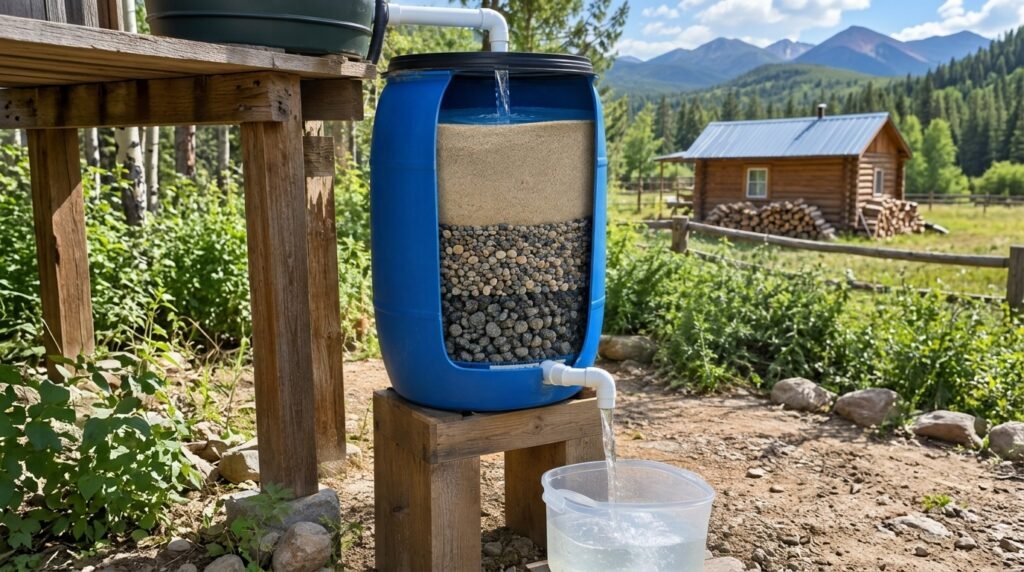
So, you’re wondering if you can actually build a sand water filter yourself and if it’s any good? The short answer is yes, you absolutely can, and with the right approach, it can be a surprisingly effective way to clean water, especially in a pinch or for non-potable uses. Think of it as a basic but practical way to get clearer water, not necessarily bottled-water pristine, but significantly better than what you started with.
Table of Contents
Why Bother with a DIY Sand Filter?
Let’s be honest, the idea of building your own water filter might sound a bit… rustic. But there are solid reasons why people are still exploring and refining these DIY solutions. It’s not just about being resourceful; it’s about accessibility and a growing understanding of how simple materials can make a difference.
Getting Cleaner Water in Remote or Emergency Situations
When you’re off the grid, facing an unexpected outage, or just living somewhere with limited access to clean water, a DIY filter can be a lifesaver. It’s about having a tangible way to improve the water you have available, even if it’s from a stream or a well that’s a bit suspect. The UNDP’s work in Timor-Leste with low-cost sand filters is a great example of this practical application, aiming to reduce costs and improve water security in challenging areas. This isn’t about fancy gadgets; it’s about leveraging readily available materials to meet a basic need.
Understanding Basic Filtration Principles
Building a DIY sand filter is also a fantastic learning experience. It demystifies the process of water purification. You get to see firsthand how different layers of materials trap different sizes of particles. It’s a hands-on way to understand physics and chemistry in action. This kind of practical knowledge can be incredibly empowering, giving you a deeper appreciation for the water you drink every day.
A Cost-Effective Solution
Let’s face it, commercial water filters can be expensive, and replacement cartridges add up. A DIY sand filter, on the other hand, uses materials that are often cheap or even free if you’re clever about sourcing them. This makes it a sustainable option for individuals and communities looking to manage their water needs without breaking the bank.
If you’re interested in creating your own DIY sand water filter, you might also find it helpful to explore a related article on setting up a gravity-fed water system for off-grid homes. This resource provides valuable insights into sustainable water solutions and complements the sand filter project by offering a comprehensive guide on how to effectively manage water resources in an off-grid setting. You can read more about it here: Gravity-Fed Water System Setup for Off-Grid Homes.
The Classic DIY Sand Filter Design: Layer by Layer
The most common and effective DIY sand filter relies on a layered approach. It’s a concept that’s been around for a long time, and with good reason. The different layers work together to progressively remove impurities. You’ll often see this design recommended by organizations like NASA JPL and Mother Earth News for their educational and practical value.
The Container: What to Use?
You need something to hold all your filtration layers.
Plastic Bottles: The Go-To for Small Projects
For smaller, individual-scale filters, a large plastic soda bottle is perfect. You’ll typically cut off the bottom, invert the bottle, and use the neck as your outlet. This is the classic setup you’ll see in many DIY guides because it’s readily available and easy to work with.
Buckets and Larger Containers: For More Volume
If you need to filter a larger quantity of water, consider using food-grade buckets or other sturdy containers. These allow for more layers and a greater surface area for filtration, meaning you can process more water at once. Ensure the container is clean and has a way for the filtered water to exit from the bottom.
The Filtration Layers: The Heart of the Filter
This is where the magic happens. The order and type of materials are crucial.
Gravel: The Foundation Layer
At the bottom, you’ll typically have a layer of gravel. This serves a few purposes:
- Support: It keeps the finer materials above it from clogging the outlet.
- Coarse Filtration: It removes larger debris like leaves and twigs right away.
- Drainage: It helps water flow through the filter efficiently.
You’ll want to use gravel of varying sizes, starting with larger stones at the very bottom and progressively smaller ones as you go up. Rinse the gravel thoroughly before adding it to your filter.
Sand: The Main Workhorse
This is the star of the show. Sand is incredibly effective at trapping smaller suspended particles.
- Particle Size Matters: The finer the sand, the better it is at trapping smaller impurities. However, very fine sand can slow down the filtration process considerably. A good balance is often found with playground sand or builder’s sand.
- Washing is Key: Before you put any sand into your filter, you must wash it thoroughly. Fill your container with sand, add water, stir vigorously, and pour off the cloudy water. Repeat this process until the water runs clear. This removes dirt, silt, and other fine particles that would otherwise just wash through or cloud your filtered water.
Activated Charcoal: The Odor and Taste Fighter
This is the secret weapon for improving the water’s palatability.
- How it Works: Activated charcoal has a porous structure that adsorbs (not absorbs – a subtle but important difference!) chemicals, chlorine, and other compounds that cause bad tastes and odors. Think of it like a sponge for molecules that affect flavor and smell.
- DIY vs. Purchased: You can buy activated charcoal (often sold for aquarium filters) or try to make your own by burning wood until it’s charred, then crushing it. However, commercially produced activated charcoal is generally much more effective due to its consistent pore structure.
Cloth or Coffee Filters: The Final Polish
At the very top, or sometimes between layers, a piece of clean cloth (like cotton) or a coffee filter can act as a pre-filter and help keep the sand from washing away.
Building Your Filter: Step-by-Step
Let’s put it all together. It’s simpler than you might think.
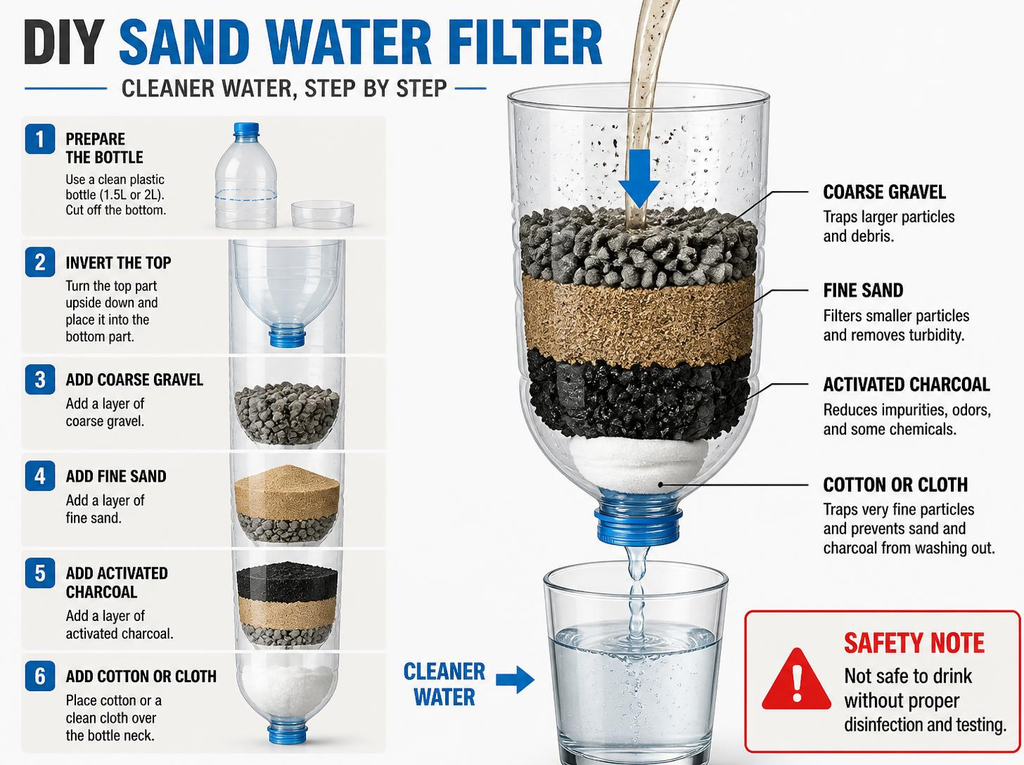
1. Prepare Your Container
- Bottle: Cut the bottom off a large plastic bottle. Ensure the cap is either removed or has a small hole punched in it for water to drain.
- Bucket: Drill a small hole near the bottom of the bucket or install a spigot.
2. Layer the Materials (Bottom to Top)
- Cloth/Coffee Filter: Place a piece of cloth or a coffee filter inside the neck of the inverted bottle or over the outlet of your bucket. This prevents your filtering materials from falling out.
- Gravel: Start with a layer of larger gravel, followed by progressively smaller gravel. Aim for a few inches of each.
- Sand: Add a generous layer of your thoroughly washed sand. This is usually the thickest layer in your filter.
- Activated Charcoal: Add a layer of activated charcoal.
- More Sand (Optional): Some designs add another layer of sand on top of the charcoal to prevent it from floating.
- Another Cloth Layer: A final layer of cloth on top can act as a pre-filter for very large debris and help keep the top sand layer from disturbing too much.
3. Rinse and Prime Your Filter
Before you use your filter for drinking water, you need to rinse it thoroughly. Pour clean water through it multiple times until the water coming out is clear. This washes away any remaining dust from the materials and settles the layers.
Using and Maintaining Your DIY Sand Filter
Once it’s built, you’re not done! Proper use and maintenance are key to its effectiveness and longevity.
Pouring Water In: Slowly and Steadily
Don’t just dump water into your filter. Pour it in slowly and steadily, allowing it to soak into the layers. If you pour too fast, you can disturb the layers and reduce the filter’s efficiency.
What to Expect: Clarity, Not Sterility
This is important: a DIY sand filter will make your water clearer. It will remove suspended solids, dirt, and some larger microorganisms. It can also improve taste and odor thanks to the charcoal. However, it is not a guaranteed way to make biologically unsafe water safe to drink on its own. For true purification, especially in emergency situations, boiling the filtered water is still the most reliable method.
When to Change Materials: Signs of Wear
- Flow Rate: If the water starts flowing through very slowly, your filter might be clogged.
- Clarity Decreases: If the filtered water isn’t as clear as it used to be, the sand layers may be exhausted.
- Odor/Taste Returns: If the charcoal layer loses its effectiveness, you might notice unpleasant tastes or smells coming back.
You’ll likely need to replace the sand and charcoal periodically. The gravel layer can often be rinsed and reused.
If you’re interested in enhancing your off-grid living experience, you might find it beneficial to explore a related article that delves into the challenges and realities of this lifestyle. The insights provided in the article can help you understand the importance of sustainable practices, such as creating your own DIY sand water filter. For more information on the complexities of off-grid living, check out this informative piece on the brutal truth of off-grid living.
Modern Innovations: Sand Filters Aren’t Static
While the basic DIY layered filter is a classic, the science behind sand filtration is still evolving. It’s fascinating to see how technology is being integrated.
Nanotech-Coated Sand: The Next Level
Researchers are looking at ways to boost the performance of sand filters dramatically. One exciting development is nanotech-coated sand. This isn’t something you can easily DIY at home (yet!), but it shows the future potential. Studies suggest this advanced sand can remove significantly more impurities – up to five times more than regular sand!
- How it Works: Tiny nanoparticles are added to the sand. These nanoparticles have unique properties that can attract and bind to a wider range of contaminants, including heavy metals and even some viruses.
Nanotech-Based Filters: Big Wins
The impact of these innovations is already being recognized. An engineer from Tanzania, Askwar Hilonga, developed a sand-based nanotech filter that won a major African innovation prize. This filter is designed to tackle serious contaminants like bacteria, viruses, fluoride, and copper, offering a more comprehensive solution for water purification in challenging environments.
Robots for Maintenance: Keeping Filters Running
Even established, large-scale sand filtration systems are getting upgrades. In the Netherlands, a utility is using robots to clean their sand filters. This is a significant advancement because it allows the filters to be cleaned without being taken offline. This means a more consistent supply of treated water and improved efficiency in maintenance. While this is for industrial use, it highlights the ongoing drive to optimize sand filtration technology.
Is it Safe for Drinking? The Crucial Caveat
This is the most important part. A DIY sand filter is great for making water clearer, removing sediment, and improving taste. It’s a step up from murky water. However, for genuine drinking water safety, especially if the source is questionable, a DIY filter alone is usually not enough.
Always Boil After Filtering
If you are relying on a DIY sand filter for drinking water in an emergency or a situation where water quality is uncertain, always boil the filtered water for at least one minute (or three minutes at altitudes above 6,500 feet) before consuming it. Boiling kills harmful bacteria, viruses, and parasites that a sand filter might miss.
Understand Your Source Water
The effectiveness of your DIY filter depends heavily on the quality of the water you start with. If your water is already heavily contaminated with chemicals or pathogens, a simple sand filter won’t render it safe.
Conclusion: A Practical Tool, Not a Magic Bullet
Building a DIY sand water filter is a rewarding project. It’s practical, educational, and can genuinely improve the clarity and palatability of water. The UNDP’s continued promotion of low-cost designs and the ongoing research into nanotech enhancements show that the principles of sand filtration remain relevant and are evolving. However, it’s crucial to approach it with realistic expectations. It’s a powerful tool for pre-treatment and general clarification, but for guaranteed drinking water safety, especially when in doubt, boiling the filtered water remains the essential final step. So, go ahead and build one – it’s a great way to understand water purification and be more self-sufficient, just remember that last vital step for a truly safe sip.
FAQs
What materials are needed to make a DIY sand water filter?
You need a clean plastic bottle or food-grade bucket, clean gravel, thoroughly washed sand, and a piece of clean cloth or a coffee filter. Activated charcoal is optional and may help reduce some unpleasant tastes and odors. The container also needs an outlet for the filtered water.
How does a sand water filter work?
Water passes through several layers. Gravel supports the filter and catches larger debris, while sand traps smaller suspended particles. Activated charcoal can adsorb some compounds that affect taste and odor. This process improves water clarity, but it does not guarantee that unsafe water is safe to drink.
What are the benefits of using a DIY sand water filter?
A DIY sand filter is inexpensive, simple to build, and useful for reducing sediment and improving water’s appearance and taste. It can be helpful for non-potable uses, educational projects, and as a pre-treatment step before using a verified purification method.
How often should the sand in a DIY sand water filter be replaced?
There is no fixed schedule because replacement depends on the quality and amount of water being filtered. Clean or replace the sand when the flow becomes very slow, the water becomes cloudy again, or the filter stops working effectively. Activated charcoal should be replaced when unpleasant odors or tastes return.
Are there any safety precautions to consider when using a DIY sand water filter?
Yes. Wash all materials thoroughly and rinse the completed filter until the water runs clear. Treat filtered water as potentially unsafe to drink because a DIY sand filter may not remove harmful bacteria, viruses, parasites, chemicals, or heavy metals. If the water may contain pathogens, boil it for at least one minute before drinking, or three minutes at elevations above 6,500 feet. Boiling does not remove chemical contamination.