So, you’re thinking about how to keep your food from going bad when the power’s out, or maybe you’re just aiming for a more self-sufficient lifestyle. That’s a smart move! Preserving food without electricity is totally doable, and it’s a skill that’s been around for centuries for a good reason. Forget fancy gadgets for a moment; we’re talking about time-tested methods that rely on nature’s principles.
This guide will take you through ten practical ways to preserve your delicious food finds, whether it’s from your garden, a farmer’s market, or a good old-fashioned bulk buy. We’ll keep it straightforward and focus on techniques you can actually use.
Table of Contents
The Magic of Drying: Water is Your Enemy
At its core, preserving food without electricity relies on removing the things that make food spoil: water and the microorganisms that thrive in it. Drying is one of the oldest and most effective methods. By removing moisture, you make it incredibly difficult for bacteria, yeast, and mold to grow.
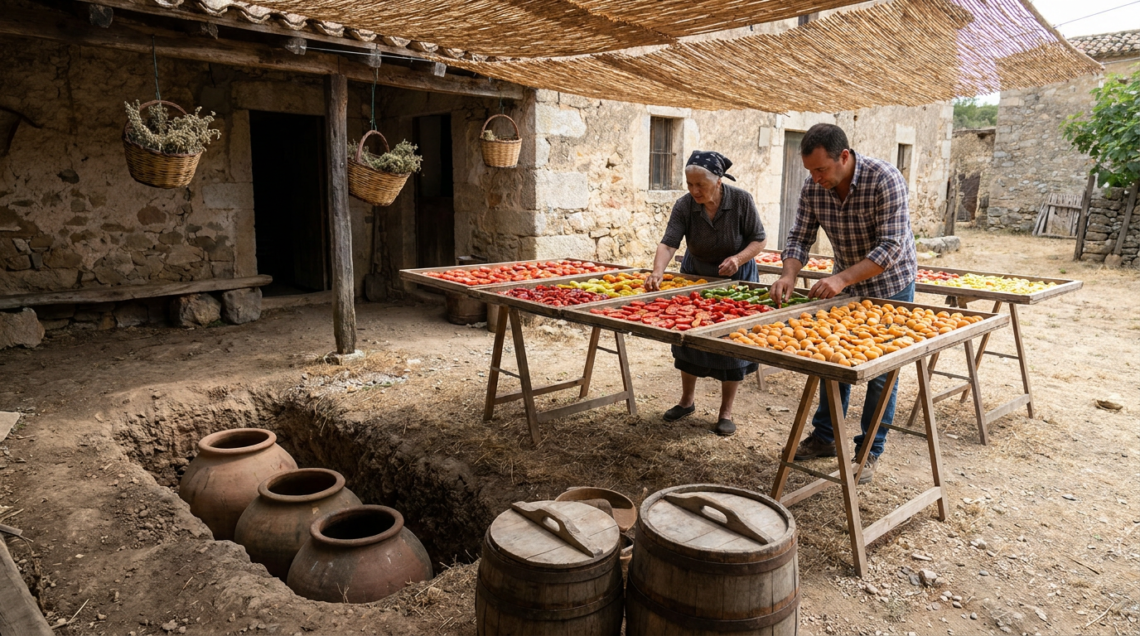
Sun Drying: Harnessing the Sun’s Power
This is the most basic and accessible method. On a sunny, dry day, you can preserve a surprising amount of food.
What You Can Dry:
- Fruits: Apples, apricots, berries, grapes (raisins!), peaches, plums, tomatoes. Slice them thinly and evenly for best results.
- Vegetables: Corn, peas, beans, herbs, peppers, mushrooms, onions, tomatoes. Again, thin slices are key.
- Meats and Fish: This is a bit more involved and often requires pre-treatment to prevent spoilage during the initial drying stages (think jerky).
The Process:
- Preparation: Wash and prepare your food. Slice fruits and vegetables thinly and uniformly. For meats, trim fat and slice thinly against the grain.
- Arrangement: Spread the food in a single layer on drying racks, screens, or clean cloths. Avoid overcrowding; air circulation is crucial.
- Location: Find a spot that gets direct sunlight for most of the day. Elevated surfaces are best to discourage pests.
- Protection: Crucially, you need to protect your drying food from insects, birds, and dew. Fine mesh screens, cheesecloth, or even a clean pillowcase can be draped over the food.
- Turning: Turn the food periodically to ensure even drying.
- Checking for Dryness: Foods are dry when they are leathery (fruits) or brittle (vegetables). They shouldn’t be sticky or pliable. This can take anywhere from a few days to over a week, depending on the food and weather conditions.
- Storage: Once completely dry, let the food cool to room temperature. Then, store it in airtight containers (glass jars or vacuum-sealed bags work well) in a cool, dark, and dry place.
Considerations:
- Weather Dependent: This method is entirely reliant on sunshine and low humidity. Extended cloudy periods or rain can ruin your efforts.
- Pest Control: Even with coverings, pests can be a nuisance. Be vigilant.
- Time Consuming: It requires patience and consistent attention.
Dehydrators: A More Controlled Approach (Even Without Electricity)
While we’re talking about without electricity, it’s worth mentioning that there are non-electric dehydrators, or ways to adapt existing ones. However, the most common and effective dehydrators do use electricity. For true off-grid, we’ll focus on the sun and other methods. If you did have a way to generate power, electric dehydrators are fantastic for their consistency and speed.
If you’re interested in learning more about sustainable living practices, you might find the article “10 Essential Skills for Off-Grid Living” particularly useful. It complements the tips provided in “10 Ways to Preserve Food Without Electricity (Off-Grid Guide)” by offering insights into other vital skills that can enhance your self-sufficiency. To explore this resource further, visit here.
The Art of Pickling: Acidity is Your Ally
Pickling uses a brine, usually vinegar or a saltwater solution, to create an acidic environment that inhibits bacterial growth. It’s a fantastic way to preserve tangy, flavorful snacks and side dishes.
Vinegar Pickling: The Classic Choice
Vinegar’s acidity is potent enough to preserve many foods without the need for advanced sterilization techniques, making it a great off-grid option.
What You Can Pickle:
- Vegetables: Cucumbers (dill pickles!), carrots, onions, peppers, green beans, cauliflower, beets, radishes, garlic.
- Fruits: Watermelon rind, sometimes even apples.
- Eggs: Pickled eggs are a hearty snack.
The Process:
- Preparation: Wash and prepare your vegetables or fruits. You can pickle them whole, sliced, or cut into pieces.
- Brine: The most common brine is made with vinegar (typically 5% acidity), water, salt, and sugar (optional, for taste). Proportions vary depending on the recipe, but a general starting point is 1:1 vinegar to water. Use non-iodized salt (kosher salt or pickling salt).
- Flavorings: Add dill, garlic, mustard seeds, peppercorns, chili flakes, or other spices to the jars for flavor.
- Packing Jars: Pack your prepared food tightly into clean glass jars. Leave about ½ inch of headspace.
- Adding Brine: Pour the hot brine over the packed food, ensuring it is completely submerged.
- Sealing: Wipe the rims of the jars, place on lids, and screw on bands.
- Processing (Optional but Recommended): For longer shelf life, you can water bath can these pickles. However, if you’re strictly off-grid and aiming for shorter-term storage or refrigeration, you can skip this. If refrigerating, they are ready to eat within a few days and will last for several weeks to months.
- Storage: If not water bath canned, store pickled items in the refrigerator. If properly canned, they can be stored in a cool, dark pantry for up to a year.
Considerations:
- Acidity Level: Ensure your vinegar has at least 5% acidity. Lower acidity can lead to spoilage.
- Salt Type: Avoid table salt with iodine and anti-caking agents, as they can make the brine cloudy.
- Shelf Life: Unprocessed pickled items will have a shorter shelf life and generally require refrigeration.
Fermentation: The Probiotic Powerhouse
Fermentation relies on beneficial bacteria (lactobacillus) to convert sugars into lactic acid. This acid acts as a natural preservative, creating that classic tangy flavor. It’s a living food that’s also incredibly good for your gut.
What You Can Ferment:
- Vegetables: Cabbage (sauerkraut!), carrots, cucumbers (dill pickles again!), kimchi, beets, radishes, green beans.
- Dairy: Yogurt, kefir.
- Drinks: Kombucha, water kefir.
The Process (General for Vegetables):
- Preparation: Chop, shred, or prepare your vegetables. For sauerkraut, you’ll shred cabbage and massage it with salt.
- Brining: For most vegetable ferments, you’ll create a simple brine (water and salt) or rely on the salt drawing out the natural juices of the vegetables (like in sauerkraut). The salt concentration is key – usually around 2-3% of the vegetable’s weight.
- Packing: Pack the vegetables tightly into clean jars or crocks, ensuring they are submerged in their own brine or a created brine. Use a fermentation weight or a ziplock bag filled with brine to keep everything below the surface.
- Covering: Cover the opening with a lid that allows gases to escape (an airlock is ideal, but cheesecloth secured with a band can work for short-term ferments, though it’s more prone to pests).
- Fermentation: Leave the jars at room temperature (ideally between 60-75°F / 15-24°C) for anywhere from a few days to a few weeks, depending on your desired tanginess and the type of food. You’ll see bubbling as the fermentation process occurs.
- Checking: Taste periodically to gauge the flavor.
- Storage: Once fermented to your liking, remove any weights and seal the jars. Store in a cool place (like a root cellar or a cool basement). Refrigeration will slow down the fermentation process significantly. Properly fermented foods can last for months.
Considerations:
- Cleanliness: While fermentation involves beneficial bacteria, it’s still important to maintain cleanliness to prevent undesirable mold or yeast growth.
- Temperature: Consistent, moderate temperatures are best. Too hot can kill the beneficial bacteria; too cold can slow the process to a crawl.
- Submergence: Keeping the food submerged in brine is crucial to prevent mold.
The Power of Salt: A Centuries-Old Preservative
Salt has been used for millennia to preserve meats and fish. It works by drawing out moisture and creating an environment hostile to microorganisms.
Dry Curing: No Liquid Needed
This is the simplest form of salting, where food is directly rubbed with salt.
What You Can Cure:
- Meats: Bacon, ham, prosciutto, corned beef, jerky.
- Fish: Lox, some types of dried fish.
The Process:
- Preparation: Trim excess fat and select good quality cuts of meat or fish. Ensure they are fresh, not previously frozen.
- Salt Mixture: You’ll need a curing salt mix. This typically includes non-iodized salt (kosher or sea salt) and sometimes curing salts like Prague Powder #1 (for cured meats with a pink hue and to prevent botulism). Always follow specific curing salt instructions for safe ratios. Sugar can also be added for flavor and to help tenderize.
- Rubbing: Rub the salt mixture liberally all over the food. Ensure every surface is covered.
- Packing: Place the salted food in a non-reactive container (glass, ceramic, or food-grade plastic) and cover it.
- Refrigeration/Cool Storage: This curing process typically requires a cool environment, ideally refrigerator temperatures (around 35-40°F / 1-4°C). If you truly have no refrigeration, a very cool, consistently temperate cellar might work for certain types of cures, but this is risky without reliable temperature control.
- Rinsing and Drying: After the curing period (which can range from days to weeks depending on the size and type of food), rinse off the excess salt and pat the food thoroughly dry.
- Further Drying/Smoking (Optional): For products like jerky or some cured meats, you’ll want to dry them further (see drying methods) or smoke them for added preservation and flavor.
Considerations:
- Curing Salts: For meats, using curing salts (like Prague Powder #1) is highly recommended to prevent botulism, a serious foodborne illness. These are different from regular table salt.
- Temperature Control: Consistent, cool temperatures are vital for safe curing.
- Hygiene: Meticulous cleanliness during preparation is a must.
Brining (Wet Curing): Submerged in Saltwater
This method involves immersing food in a salt and water solution.
What You Can Brine:
- Meats: Turkey, chicken, pork, beef.
- Fish: Salmon.
- Vegetables: Olives (though often fermented too).
The Process:
- Brine Creation: Mix non-iodized salt with water. The concentration of salt will depend on the desired outcome and duration of brining. A basic brine might be 1 cup of salt per gallon of water. Some recipes include sugar, herbs, and spices.
- Immersing Food: Place your food (meat or fish) in the brine, ensuring it is completely submerged. Use a weight if necessary to keep it down.
- Cool Storage: As with dry curing, this method requires cool storage. A refrigerator is ideal. Without one, a very cool cellar is needed, and this method becomes more risky for extended preservation.
- Duration: Brining times vary greatly, from a few hours for poultry to many days for larger cuts of meat.
- Rinsing and Cooking/Smoking: After brining, rinse the food well and then cook or smoke it. Brining alone doesn’t always “preserve” in the sense of long-term shelf stability without other methods. It primarily tenderizes and flavors.
Considerations:
- Salt Concentration: Too little salt and it won’t preserve; too much and it will be unpalatable. Follow recipes carefully.
- Cool Temperatures: Again, refrigeration or very cool storage is crucial for safety.
The Cool Embrace of Root Cellars and Basements: Natural Refrigeration
Before modern refrigerators, people relied on the earth’s natural coolness to extend the life of produce. Root cellars and cool, dark basements are your best friends here.
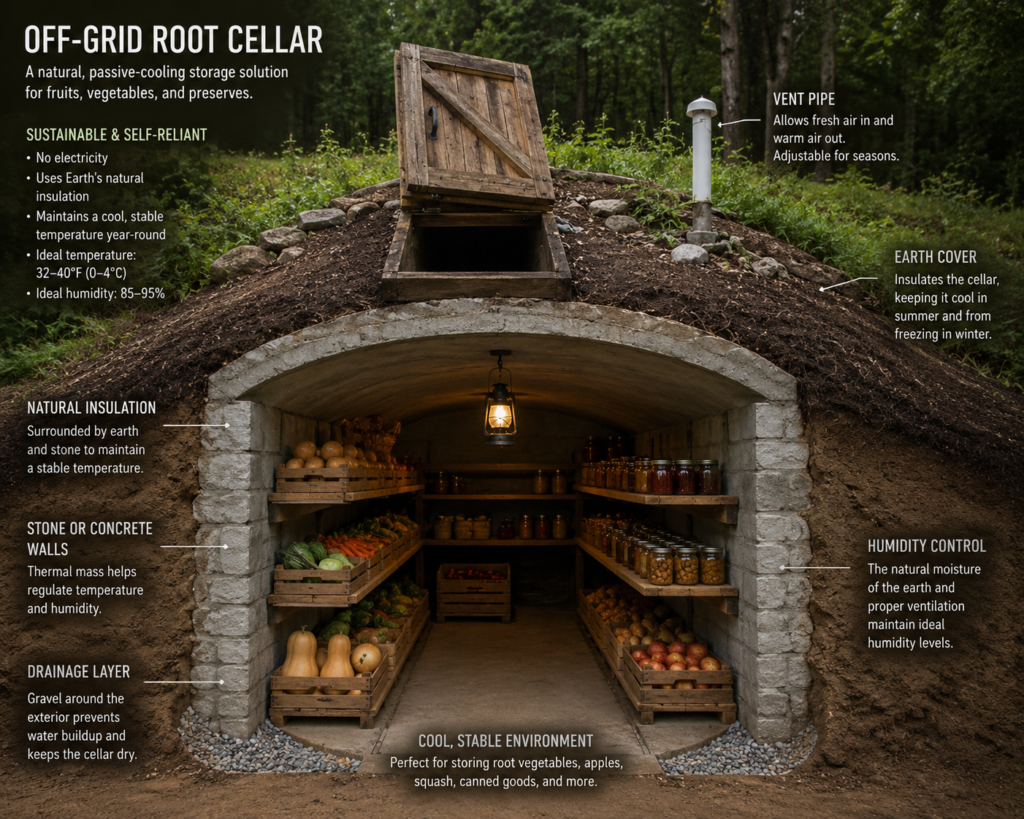
Root Cellars: Nature’s Pantry
A dedicated root cellar is an underground structure designed to maintain a consistent cool temperature and high humidity, perfect for storing root vegetables and other produce.
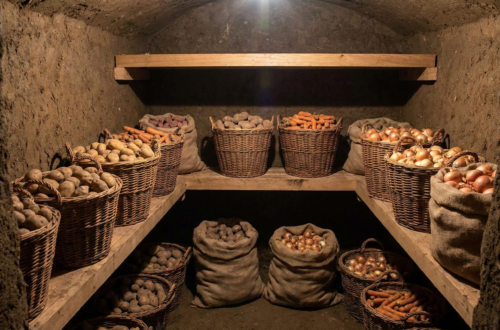
What You Can Store:
- Root Vegetables: Potatoes, carrots, beets, turnips, parsnips, onions, garlic.
- Winter Squash: Pumpkins, butternut squash, acorn squash.
- Apples and Pears: Many varieties store well.
- Cabbage: Can be stored whole.
- Nuts: In their shells.
The Setup:
- Location: Ideally underground or built into a hillside.
- Ventilation: Crucial for preventing spoilage and mold. A way for air to circulate in and out is necessary.
- Temperature: Aim for a consistent temperature between 32-40°F (0-4°C).
- Humidity: High humidity (85-95%) is ideal for most root vegetables, but onions and garlic prefer it drier.
Storing Produce:
- Curing: Many root vegetables (like potatoes and onions) need to be “cured” for a period after harvest to toughen their skins and seal any minor cuts.
- Sorting: Remove any bruised or damaged items. They will spoil faster and can affect surrounding produce.
- Storage Medium: Store in crates, bins, or burlap sacks. Some vegetables (like carrots and beets) do well packed in damp sand or sawdust to maintain humidity.
- Separation: Store different types of produce separately. For example, apples can release ethylene gas that speeds up the ripening and spoilage of other produce. Onions and potatoes shouldn’t be stored together.
Considerations:
- Temperature Fluctuations: Even in a root cellar, extreme seasons can affect temperature. Monitor regularly.
- Pests: Rodents can be an issue in root cellars.
- Moisture Management: Too much moisture with the wrong produce can lead to rot.
Cool Basements and Unheated Spaces: A Practical Alternative
If you don’t have a dedicated root cellar, a cool, dark basement, an unheated garage, or even a cool pantry can offer some degree of preservation. The key is consistency.
Best Practices:
- Darkness: Light can cause some produce (like potatoes) to sprout and become bitter.
- Cool Temperatures: The cooler, the better, but avoid freezing.
- Ventilation: Ensure some air movement to prevent stale air and moisture buildup.
- Rodent Proofing: This is especially important for detached garages or less frequently accessed areas.
- Use Bins/Crates: Storing items off the floor is generally a good idea.
If you’re interested in sustainable living and food preservation techniques, you might also want to explore the financial aspects of transitioning to an off-grid lifestyle. Understanding the costs involved can help you make informed decisions about your food storage methods. For a deeper insight into this topic, check out this article on how much it costs to go off-grid, which provides valuable information that complements the strategies outlined in “10 Ways to Preserve Food Without Electricity.”
Preservation Through Sugar: Sweet Solutions
Sugar, like salt, has preservative qualities. It works by drawing out moisture and inhibiting microbial growth.
Jams and Jellies: Sweet Preservation
Making jams and jellies is a classic way to preserve fruit. The high sugar concentration creates a barrier against spoilage.
What You Can Make:
- Fruit Jams: Berry jams, plum jam, peach jam, apple butter (technically a preserve that’s cooked longer).
- Fruit Jellies: Grape jelly, apple jelly.
The Process:
- Fruit Preparation: Wash and prepare your fruit, removing seeds, pits, and stems as needed.
- Pectin: You’ll need a source of pectin (natural in some fruits like apples and berries, or added commercial pectin for consistency). Pectin helps the jam/jelly set.
- Sugar: The sugar acts as a preservative. The general ratio is often 1:1 fruit to sugar, though this can be adjusted slightly depending on preference and the fruit’s natural sugar content.
- Cooking: Cook the fruit, sugar, and pectin mixture until it reaches the setting point. This can be done on a stovetop.
- Jarring: Ladle the hot jam or jelly into sterilized glass jars. Wipe rims clean and seal with lids.
- Water Bath Canning (Recommended for Shelf-Stability): For long-term, shelf-stable storage, you’ll need to water bath can the jars. This involves simmering the sealed jars in boiling water for a specific time.
- Storage: Properly canned jams and jellies can last for 1-2 years in a cool, dark pantry. Once opened, they require refrigeration.
Considerations:
- Sugar Content: A high sugar content is necessary for preservation. Jams marketed as “low sugar” or “sugar-free” often rely on refrigeration or very short shelf lives.
- Sterilization: Properly sterilizing jars and lids is crucial for safe canning.
- Setting Point: Achieving the correct “setting point” is key for a good texture. This can be tested by putting a spoonful on a chilled plate; if it wrinkles, it’s ready.
The Magic of Fats: Sealing Out Air
Historically, rendering fats like lard or suet was a vital preservation technique, especially for meats. Covering cooked foods in a thick layer of fat creates an airtight seal, preventing oxidation and spoilage.
Confit: Slow-Cooking in Fat
Confit, particularly for meats like duck or pork, involves slow-cooking the food in its own rendered fat.
What You Can Confit:
- Meats: Duck legs, pork shoulder, chicken thighs.
- Garlic and other vegetables: Can also be confited.
The Process:
- Rendering Fat: You’ll need to render or source a significant amount of fat (usually from the same animal).
- Seasoning: Season the meat generously with salt and herbs.
- Slow Cooking: Place the seasoned meat in an oven or on a very low stovetop and submerge it completely in the rendered fat. Cook at a very low temperature (around 200-250°F / 95-120°C) for several hours until tender.
- Cooling and Storage: Once cooked, let the meat cool in the fat. As it cools, the fat will solidify. Store the confit-covered meat in a cool, dark place. The solidified fat acts as a natural seal. For longer storage, it’s best to then store it in a cool cellar or, ideally, refrigerate it if power is available for extended periods.
- Reheating: To serve, gently warm the container to melt the fat and extract the meat.
Considerations:
- Fat Quality: Use good quality, fresh fat.
- Airtight Seal: The solidified fat is the preserving agent. Ensure it completely covers the food.
- Cool Storage: While the fat layer preserves, storing in a cool environment will significantly extend its shelf life and ensure safety.
Smoking: Flavor and Preservation
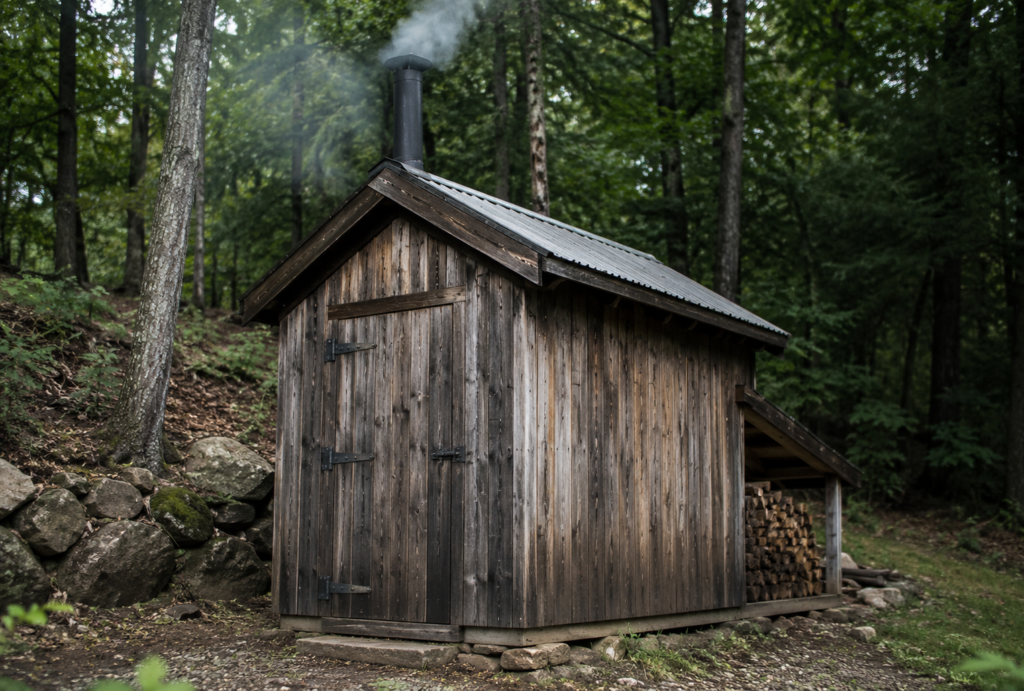
Smoking food, especially meats and fish, uses both the drying effect of the smoke and, if done at higher temperatures, the cooking aspect. It also imparts compounds from the smoke that have antimicrobial properties.
Cold Smoking vs. Hot Smoking:
- Cold Smoking: Done at low temperatures (below 80°F / 27°C). Primarily for flavor and preservation without cooking. Requires pre-curing (salting or brining) the food. Examples: smoked salmon, some cured meats.
- Hot Smoking: Done at higher temperatures (140-180°F / 60-82°C or higher). Cooks the food while smoking. Examples: smoked chicken, pork ribs.
What You Can Smoke:
- Meats: Bacon, ham, jerky, sausages.
- Fish: Salmon, trout, mackerel.
- Cheeses: Many types of cheese can be smoked.
The Process (General):
- Preparation: Clean and trim food. For meats and fish, a salt cure (dry or wet) is usually required beforehand to remove moisture and prevent spoilage during the smoking process.
- Smoking Rig: You can build a simple smoker using a drum or metal box with a heat source (wood chips or charcoal) and a way for smoke to circulate.
- Temperature Control: Maintain the correct temperature for cold or hot smoking.
- Time: Smoking times vary from a few hours to several days depending on the food and method.
- Storage: Properly smoked and dried foods can last for a considerable time. Cold-smoked items are more perishable and may require refrigeration or further preservation. Hot-smoked items that have been cooked through have a longer shelf life.
Considerations:
- Safety: For meats, proper curing is essential before cold smoking to prevent botulism.
- Wood Type: Different woods impart different flavors. Fruitwoods, hickory, and oak are popular choices.
- Drying: For long-term storage, the food should also be relatively dry after smoking.
Putting It All Together: A Multi-Pronged Approach
Often, the most effective food preservation off-grid involves using a combination of these methods. For example:
- Drying vegetables and then storing them in airtight containers.
- Pickling vegetables for quick use and then fermenting others for gut health and longer storage.
- Curing meats and then smoking them for extended shelf life.
- Making jams and then canning them to enjoy fruit year-round.
- Utilizing root cellars for fresh produce storage through the winter.
Learning these skills takes practice, but the rewards of flavorful, preserved food without relying on electricity are well worth the effort. Start small, experiment, and find what works best for you and your resources. Happy preserving!
FAQs
1. What are some methods for preserving food without electricity?
Some methods for preserving food without electricity include canning, fermenting, drying, smoking, and pickling.
2. How does canning work as a method of food preservation?
Canning involves placing food in jars and heating them to a high temperature to kill bacteria and create a seal, preserving the food for long-term storage.
3. What is the process of fermenting food for preservation?
Fermenting food involves using beneficial bacteria to break down sugars and starches in the food, creating an acidic environment that preserves the food and enhances its flavor.
4. How does drying food work as a preservation method?
Drying food involves removing moisture from the food, which inhibits the growth of bacteria and mold, allowing the food to be stored for long periods of time.
5. What are some tips for preserving food without electricity in an off-grid setting?
Some tips for preserving food without electricity in an off-grid setting include using root cellars for storing root vegetables, utilizing salt and sugar for preserving meats and fruits, and using natural cooling methods such as evaporative cooling.


One comment on “10 Ways For Preserving Food Without Electricity ( Ultimate Off-Grid Guide)”