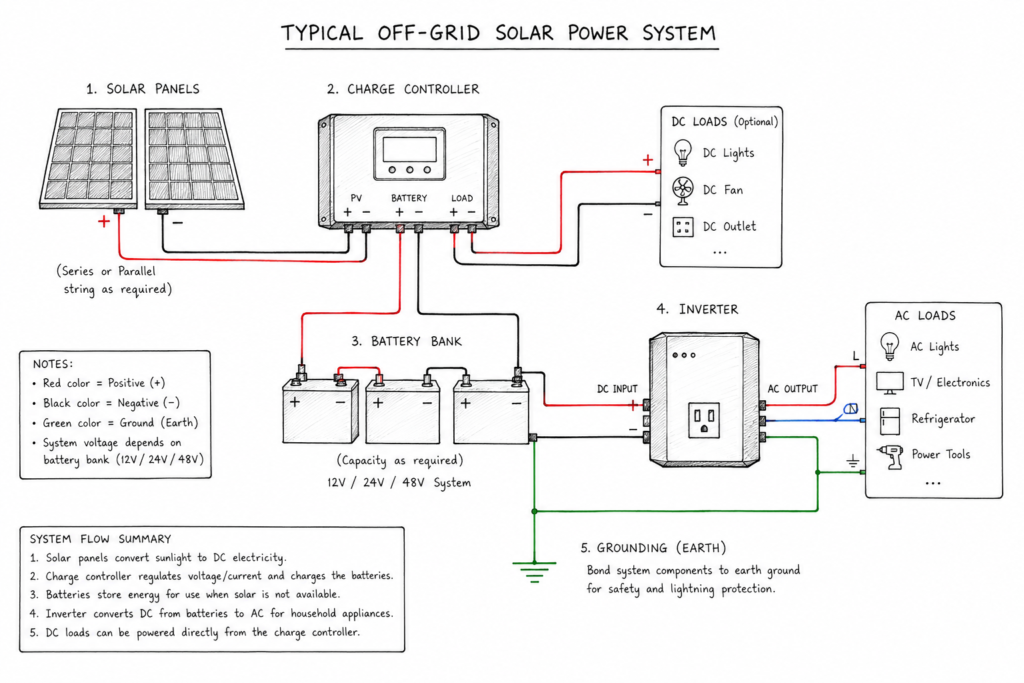
So, you’re looking to untangle the mystery of off-grid solar wiring, huh? Good on you! It might seem like a daunting task at first, all those wires and components, but trust me, understanding the basic diagram isn’t rocket science. In a nutshell, an off-grid solar wiring diagram shows you how to connect your solar panels, charge controller, battery bank, and inverter to create a self-sufficient power system. It’s the roadmap to generating your own electricity without relying on a utility grid. Let’s break it down into manageable chunks.
Before we jump into the diagrams, it’s helpful to get acquainted with the main players in your off-grid setup. Each component has a specific job, and they all work together in a neat, organized fashion.
Table of Contents
Solar Panels: Your Energy Harvesters
Think of your solar panels as the primary source. They’re the ones out there soaking up the sun’s rays and converting that light into direct current (DC) electricity. The more panels you have, the more power you can generate.
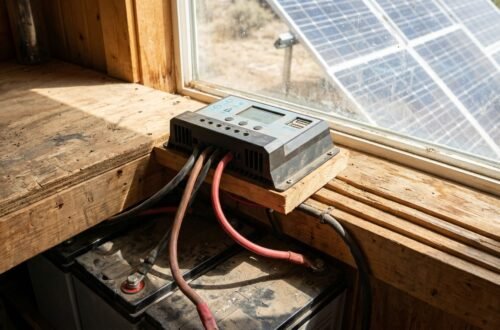
Charge Controller: The Battery’s Bodyguard
This component is crucial. The charge controller sits between your solar panels and your battery bank. Its main job is to regulate the voltage and current coming from your panels to your batteries. Without it, you’d overcharge your batteries, significantly shortening their lifespan, or even worse, damaging them.
Battery Bank: Your Energy Storage Vault
Your battery bank is where all that lovely solar-generated electricity gets stored for later use, especially when the sun isn’t shining (like at night or on cloudy days). These are typically deep-cycle batteries, designed for regular, deep discharges.
Inverter: The DC to AC Converter
Most of our household appliances run on alternating current (AC) electricity. Since your solar panels and batteries produce and store DC power, you need an inverter to convert that DC into usable AC. It’s the bridge between your off-grid system and your everyday electronics.
DC and AC Loads: What You’re Powering
These are simply the devices and appliances you want to run. Some things, like certain lights or USB chargers, might run directly off DC. Most other things, like your fridge, TV, or laptop charger, will need AC power from the inverter.
For those looking to delve deeper into the world of off-grid living, a great companion article is the one discussing the cheapest way to start off-grid living. This resource provides valuable insights and practical tips that can help beginners make informed decisions as they transition to a self-sufficient lifestyle. You can read more about it here: Cheapest Way to Start Off-Grid Living.
The Basic Flow: A Step-by-Step Overview
Imagine electricity flowing like water through pipes. It starts at one point and moves through different stages until it reaches its destination. An off-grid solar system follows a similar, logical flow.
From Sun to Panels: Generating DC Power
It all begins with the sun. When sunlight hits your solar panels, the photovoltaic cells within them generate DC electricity. This DC power then travels through wires to your charge controller.
Regulating and Storing: The Charge Controller and Batteries
Once the DC power reaches the charge controller, it’s regulated to ensure a safe and efficient charge for your battery bank. The charge controller prevents overcharging and often has features to protect against deep discharge as well. Once regulated, the DC power flows into your battery bank for storage.
Converting for Use: The Inverter’s Role
When you need to power your AC appliances, the electricity flows from your battery bank (still DC) to your inverter. The inverter then intelligently converts that DC power into AC power, ready for your household circuits.
Powering Your Life: To Your Loads
Finally, the AC power from the inverter (or DC power directly from the charge controller/batteries for DC loads) goes to your distribution panel, which then sends it out to all your appliances and devices. And voilà, you’re off-grid!
Understanding Wiring Standards and Safety
Safety is paramount when working with electricity, especially with higher voltage systems. Don’t cut corners here; it’s not worth the risk.
Wire Sizing: It Matters More Than You Think
Using the correct wire gauge is critical. Too thin a wire for the amount of current flowing through it will cause resistance, leading to voltage drop and heating, which can be a fire hazard. There are charts and calculators available online (just search for “solar wire gauge calculator”) that can help you determine the appropriate wire size based on current, voltage, and the length of your wire run. Always err on the side of slightly thicker wire if you’re unsure.
Fuses and Circuit Breakers: Your System’s Guardians
These are non-negotiable. Fuses and circuit breakers are safety devices designed to protect your components from overcurrents. If too much current flows through a circuit, the fuse will blow or the breaker will trip, breaking the circuit and preventing damage or fire.
- Between Panels and Charge Controller: You’ll typically find a fuse or breaker here to protect the wiring and charge controller from issues arising from the panel array.
- Between Charge Controller and Batteries: Another set of fuses/breakers is essential to protect the charge controller and batteries.
- Between Batteries and Inverter: High current flows in this section, making proper fusing/breaking absolutely vital for protecting the inverter and the battery bank.
- AC Output from Inverter: Just like a standard household electrical panel, the AC output from your inverter should go through its own circuit breakers before heading to your AC distribution panel.
Disconnect Switches: Emergency Shut-Offs
Having disconnect switches for your solar array, battery bank, and inverter is a really good idea. These allow you to quickly and safely de-energize parts of your system for maintenance, repairs, or in an emergency. Think of them as giant “off” switches.
Grounding: An Essential Safety Measure
Proper grounding protects against electrical shock and lightning strikes. All metal components of your solar system (panel frames, mounting rails, inverter chassis, etc.) should be properly grounded to a common grounding point, which is then connected to an earth ground rod. This directs stray current safely into the earth. Let’s sketch out a general scenario. While every system will have unique aspects, this gives you the foundational understanding.
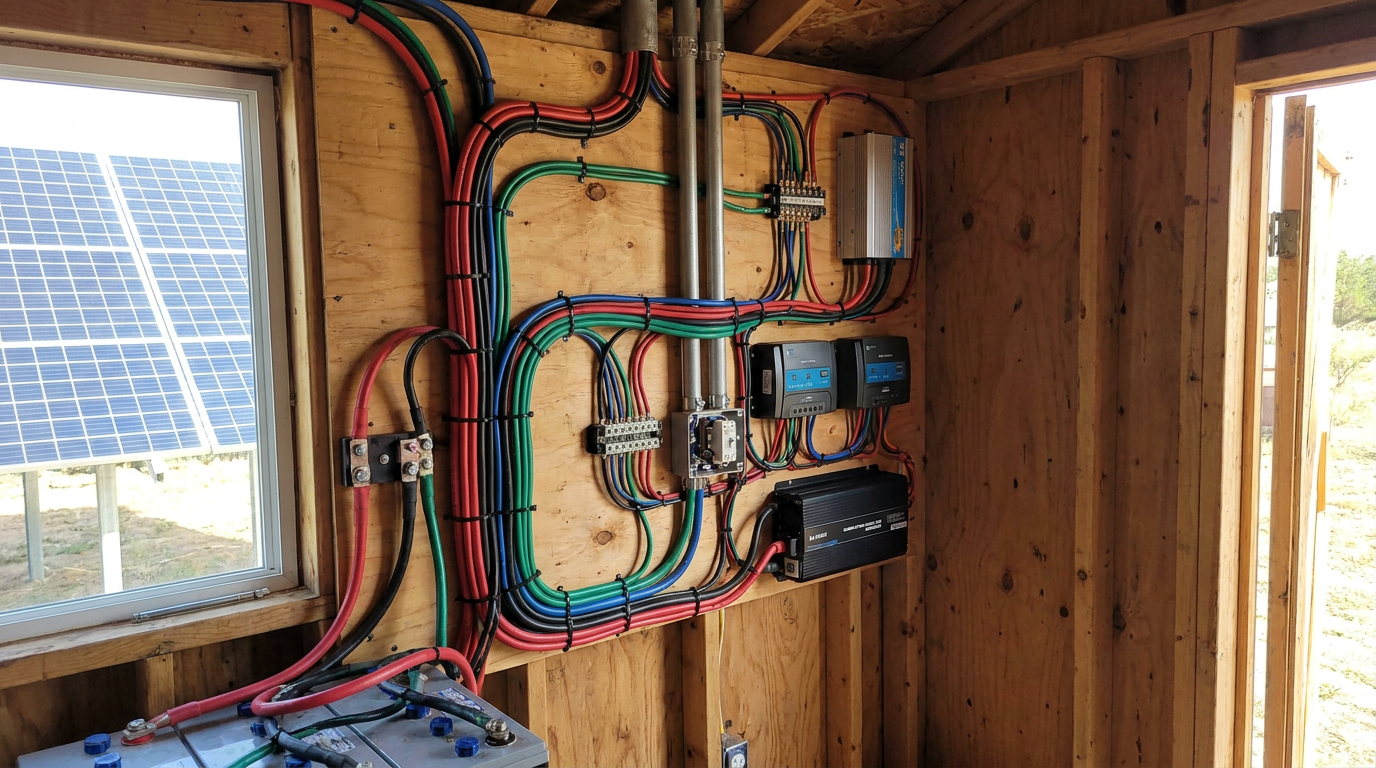
Panels to Charge Controller Connections
Your solar panels will typically be wired in series, parallel, or a combination (series-parallel) to achieve the desired voltage and current output for your charge controller.
- Series Wiring: Increases voltage. The positive terminal of one panel connects to the negative terminal of the next.
- Parallel Wiring: Increases current. All positive terminals connect together, and all negative terminals connect together.
- Series-Parallel: A common approach for larger arrays to achieve a balanced voltage and current.
From the panel array, a positive and negative wire run through a DC disconnect switch (optional but recommended) and a fuse or circuit breaker before connecting to the “PV Input” terminals on your charge controller. Make sure to observe polarity (positive to positive, negative to negative).
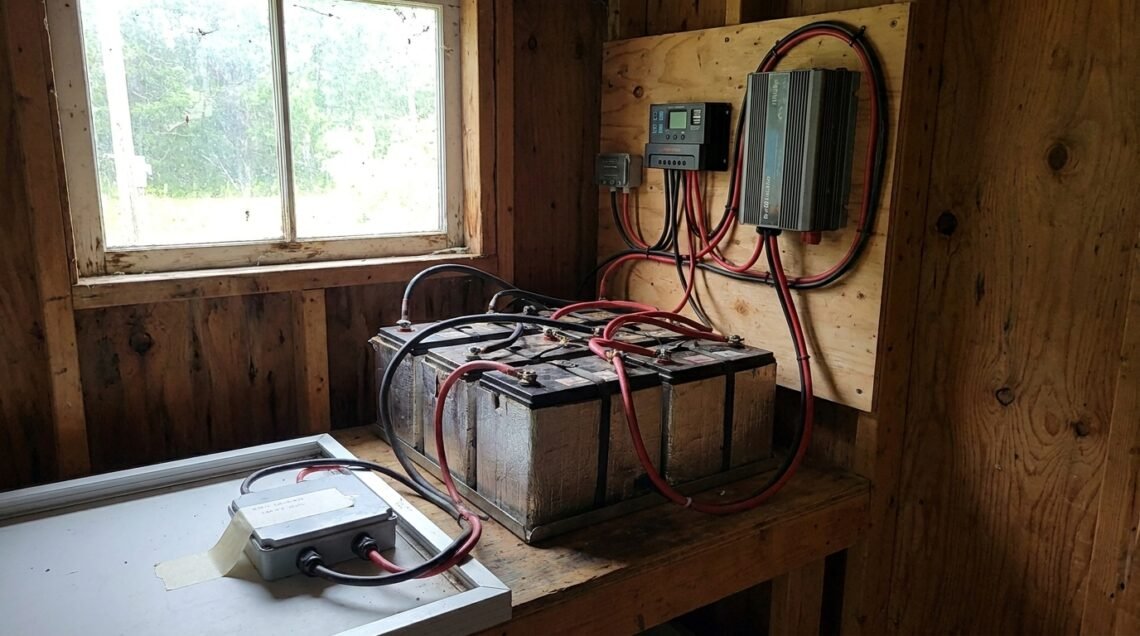
Charge Controller to Battery Bank Connections
This is a straight DC connection. A positive and negative wire run from the “Battery Output” terminals of your charge controller to your battery bank. Again, a DC fuse or circuit breaker is essential on the positive line, usually close to the battery. Ensure all connections are tight and secure. Your battery bank itself might be composed of multiple batteries wired in series, parallel, or series-parallel to achieve the desired voltage (e.g., 12V, 24V, 48V) and capacity.
Battery Bank to Inverter Connections
These connections carry the highest current in your system, especially in 12V or 24V systems. Heavy gauge wire is crucial here. A positive and negative cable run from your battery bank to the DC input terminals of your inverter.
- High-Current Fuse/Breaker: A suitably sized DC fuse or circuit breaker must be placed on the positive line, close to the battery bank. This is arguably the most important fuse in your whole system.
- DC Disconnect: A DC disconnect switch between the batteries and the inverter is also highly recommended for safety and maintenance.
Inverter to AC Distribution Panel Connections
Once the inverter has converted the DC power to AC, it needs to go somewhere.
- AC Disconnect/Breaker: The AC output from your inverter should go through an AC circuit breaker (similar to what you find in a standard household breaker panel).
- AC Distribution Panel (Load Center): From this breaker, the AC power runs to your main AC distribution panel (often called a sub-panel in off-grid setups if it’s independent of a main grid tie-in). From this panel, individual circuits with their own breakers will run to your various AC outlets and appliances.
If you’re looking to deepen your understanding of off-grid solar systems, you might find the article on off-grid living particularly helpful. This comprehensive guide offers insights into the essential components and considerations for setting up your own off-grid system, making it a great complement to the Off-Grid Solar Wiring Diagram Explained for Beginners. By exploring both resources, you can gain a well-rounded perspective on how to effectively harness solar energy in a self-sufficient manner.
Essential Considerations and Best Practices
| Component | Description |
|---|---|
| Solar Panels | Convert sunlight into electricity |
| Charge Controller | Regulates the voltage and current from the solar panels to the batteries |
| Batteries | Store the electricity generated by the solar panels |
| Inverter | Converts the DC electricity from the batteries into AC electricity for use in the home |
| Load | Appliances or devices that use the electricity generated by the solar panels |
Building an off-grid system isn’t just about making the connections; it’s about doing it smartly and reliably.
System Sizing: Don’t Skimp on Homework
Before you buy a single component, you need to calculate your power needs.
- Energy Audit: List every appliance you want to run, its wattage, and how many hours a day you plan to use it. This will give you your daily Watt-hour (Wh) consumption.
- Battery Sizing: Based on your daily Wh consumption and how many “days of autonomy” (how long you want to run without sun) you need, you can size your battery bank.
- Panel Sizing: Given your battery bank size and local solar insolation (average sunlight hours per day), you can determine how many solar panels you’ll need to recharge your batteries.
- Inverter Sizing: The inverter needs to be able to handle the continuous wattage of all the AC appliances you might run simultaneously, plus a bit of extra for surge loads (like a refrigerator starting up).
Component Compatibility: They Need to Speak the Same Language
Not all components are interchangeable.
- Voltage Matching: Ensure your panels, charge controller, battery bank, and inverter are all compatible in terms of voltage (e.g., a 12V battery bank with a 12V charge controller and a 12V inverter). For larger, more efficient systems, 24V or 48V is common.
- MPPT vs. PWM Charge Controllers: MPPT (Maximum Power Point Tracking) controllers are generally more efficient, especially in colder weather or for larger arrays, as they can more effectively convert excess panel voltage into charging current. PWM (Pulse Width Modulation) controllers are simpler and cheaper but less efficient, best suited for smaller, simpler systems where panel voltage closely matches battery voltage.
Monitoring Your System: Knowledge is Power
A good off-grid system often includes monitoring capabilities.
- Battery Monitor: This is incredibly useful. It tracks your battery’s state of charge (like a fuel gauge), current in/out, and voltage. Knowing this helps you manage your power consumption and prolong battery life.
- Charge Controller Display: Many charge controllers have built-in displays that show panel voltage, battery voltage, charging current, and sometimes power generated.
- Inverter Display: Some inverters also provide data on AC output, power consumption, and error codes.
Maintenance and Troubleshooting: Keep It Running Smoothly
Even the best-designed system needs a little love.
- Regular Checks: Periodically check all connections for tightness, signs of corrosion, or damage. Inspect wiring for fraying or exposure.
- Battery Care: For flooded lead-acid batteries, check electrolyte levels periodically and top up with distilled water. Keep battery terminals clean.
- Panel Cleaning: Dust, dirt, and bird droppings can reduce panel efficiency. Clean them regularly, especially in dry, dusty climates.
- Troubleshooting Basics: If something isn’t working, start with the basics. Is it getting sun? Are the disconnects on? Are the fuses intact? Is the inverter turned on? Often, it’s a simple fix.
This whole process can seem like a lot, but taking it one step at a time, planning carefully, and prioritizing safety will get you there. Think of it as building a little electrical ecosystem tailored to your needs. Happy wiring!
FAQs
What is an off-grid solar wiring diagram?
An off-grid solar wiring diagram is a visual representation of the electrical connections and components in a solar power system that is not connected to the main power grid. It shows how the solar panels, charge controller, battery bank, and inverter are connected to each other to generate and store electricity.
Why is it important to understand off-grid solar wiring diagrams?
Understanding off-grid solar wiring diagrams is important for beginners because it helps them grasp the basic concepts of how a solar power system works. It also allows them to troubleshoot and maintain their system more effectively, as well as make informed decisions when expanding or upgrading their setup.
What are the key components in an off-grid solar wiring diagram?
The key components in an off-grid solar wiring diagram include solar panels, charge controller, battery bank, and inverter. These components work together to capture, store, and convert solar energy into usable electricity for off-grid applications.
How do off-grid solar wiring diagrams differ from grid-tied solar wiring diagrams?
Off-grid solar wiring diagrams show a standalone solar power system that is not connected to the main power grid, while grid-tied solar wiring diagrams depict a system that is connected to the grid and may include additional components such as grid-tie inverters and net metering.
Where can beginners find resources to learn more about off-grid solar wiring diagrams?
Beginners can find resources to learn more about off-grid solar wiring diagrams from reputable sources such as solar energy websites, online forums, instructional videos, and books specifically geared towards off-grid solar power systems. It’s important to seek information from reliable sources to ensure accurate and safe installation and maintenance of off-grid solar systems.


One comment on “Off-Grid Solar Wiring Diagram Explained for Beginners”