Living off-grid means becoming independent from municipal utilities, and a reliable off-grid water system is just as crucial as power generation. Many beginners focus heavily on solar panels and batteries while overlooking one of the most fundamental needs: fresh, clean water. Without a thoughtful water setup, even the most well-designed electrical system won’t keep you comfortable off the grid. This guide walks you through every step of building an off-grid water system from scratch, whether you’re planning a remote cabin or a completely self-sufficient homestead.
The good news? Setting up off-grid water isn’t as complicated as it seems. You’ll need to collect water (from rain, wells, or springs), store it safely, treat it to make it drinkable, and distribute it throughout your home. The entire process breaks down into manageable steps that even complete beginners can tackle. Most successful systems combine multiple water sources for redundancy—if one fails, you have backups. We’ll cover everything from choosing collection methods to winterizing your system, plus practical troubleshooting tips based on what actually works in the field.
Table of Contents
Key Takeaways
- Combine multiple water sources (rain, well, spring) for system redundancy and reliability
- Storage capacity should cover 2-4 weeks of household water needs, accounting for seasonal variations
- Water treatment is non-negotiable—filtration, UV sterilization, and testing prevent waterborne illness
- A properly sized pressure tank and pump system ensures consistent water flow throughout your home
- Start simple with one collection method, then expand as your comfort level grows
Understanding Off-Grid Water System Basics
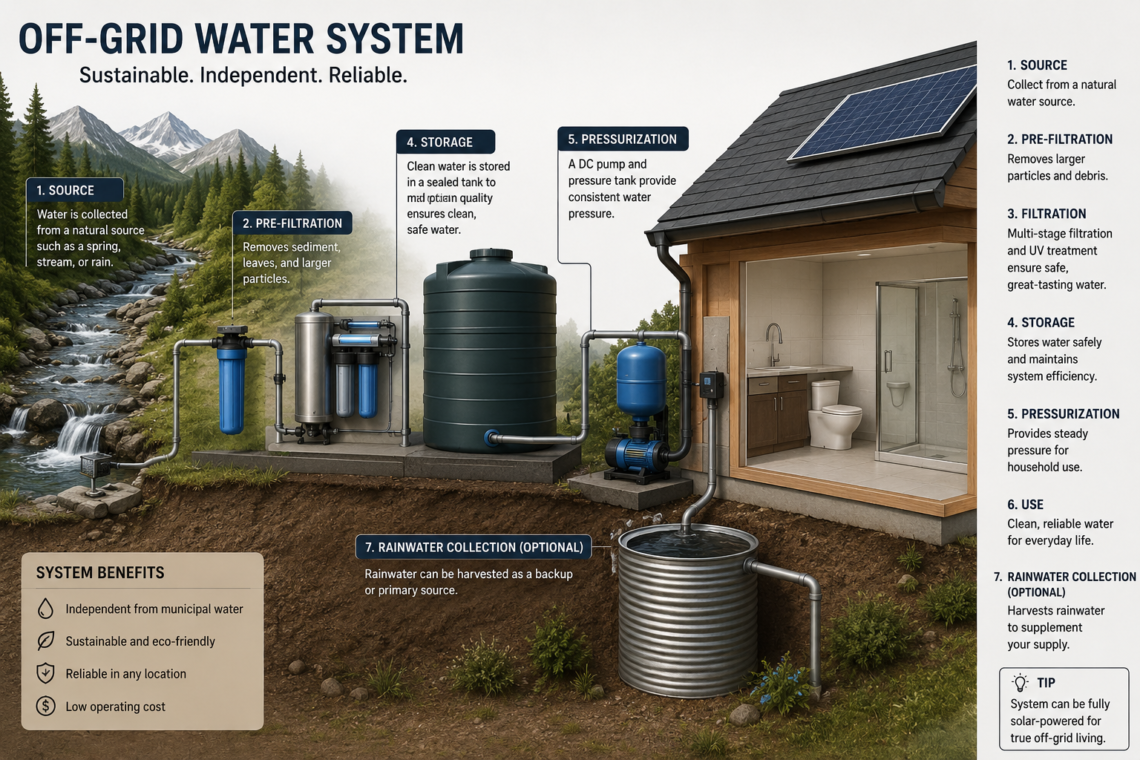
An off-grid water system operates completely independently from municipal water lines and relies on natural sources or underground reserves. Unlike grid-connected homes that receive pressurized water delivered by utility companies, your system must collect, store, treat, and distribute water on its own. This sounds daunting, but the basic mechanics are straightforward and have been used successfully for centuries.
Every off-grid water system has four essential components working together. First, you need a water source—this could be rainfall, a drilled well, a natural spring, or surface water like a pond or stream. Second, you require storage capacity to hold water during dry periods or to meet peak demand times. Third, the system must include treatment mechanisms to ensure water safety and quality. Finally, you need distribution infrastructure—pipes, pumps, and pressure systems—to deliver usable water to your kitchen, bathroom, and appliances.
What makes this practical is that you don’t need to overcomplicate things from the start. off-grid systems work best when you understand the interconnected nature of power, water, and waste management, but water systems can function independently. A simple gravity-fed rainwater system with basic filtration works wonderfully for many properties. As your needs grow or seasons change, you can add complexity—well drilling, additional storage tanks, advanced treatment stages, or backup pumping systems.
Common Water Sources Explained
Understanding your available water sources determines everything else about your system design. Not all properties have equal access to water, and what works for one location may not work for another. Assess what’s naturally available on or near your land before making investment decisions.
Rainwater is the most accessible source for most people. It’s free, relatively pure initially, and accessible through simple collection methods. However, it’s seasonal and variable—some regions receive abundant rain while others face dry stretches. Well water is more consistent but requires drilling and testing. Spring water is excellent if you have a natural spring on your property, though these are geographically limited. Surface water from ponds or streams needs the most treatment but can provide high-volume backup sources.
Water Collection Methods for Beginners
Your first decision is choosing which collection method fits your property and climate. Many successful off-grid homeowners use hybrid systems combining multiple sources for maximum resilience. This approach protects you if one source underperforms—rain might be scarce one month, but a well provides steady backup water.
Rainwater Harvesting Systems
Rainwater collection requires directing roof runoff through gutters and downspouts into storage tanks. The beauty of this method is its simplicity and low cost. Most roofs naturally shed water; you’re simply capturing what would otherwise drain away. A typical residential roof can collect roughly 600 gallons of water per inch of rainfall.
The system starts with clean gutters and downspouts. Debris, leaves, and bird droppings contaminate water at the source, so keeping gutters clear is essential maintenance. Many collectors install first-flush diverters—simple devices that discard the first 50 gallons or so of rainfall, which contains the most roof contaminants. This single addition dramatically improves water quality without expensive filtration. After the first flush passes through, clean water flows to your storage tank.
One practical consideration: roof material matters. Metal roofs (standing seam or corrugated) are ideal because they don’t leach chemicals. Asphalt shingles work but may contribute asphalt particles over time. Avoid collecting from roofs treated with algae-killing compounds. The investment in a metal roof specifically for water collection pays dividends in long-term water quality.
Well Water Systems
A well taps directly into groundwater, providing consistent supply regardless of weather. Shallow wells (25-50 feet) are cheaper to drill but may contaminate during wet seasons. Deep wells (100+ feet) cost more but access cleaner, more stable water. The tradeoff involves both initial drilling costs and the electricity or mechanical power needed to pump water to the surface.
Before drilling, consult local water tables and geological maps. Your county extension office or well drilling companies can advise on typical well depths and water availability in your area. Additionally, check water quality through testing before committing to a well as your primary source. Some wells contain iron, sulfur, or other minerals requiring treatment. A professional water test typically costs $150-300 but reveals exactly what you’re dealing with.
A common mistake beginners make is assuming any well provides drinkable water. In practice, wells can contain bacteria, nitrates, or minerals that make water unsuitable for drinking without treatment. Always test before relying on well water exclusively.
Springs and Surface Water
Natural springs deliver gravity-fed water—a tremendous advantage since you don’t need pumps. However, springs are geographically dependent and require professional assessment before use. Mountain springs flowing from rock typically offer cleaner water than lowland springs. Either way, treatment remains necessary because surface water can harbor parasites and bacteria.
Streams and ponds require the most treatment but can serve as high-volume emergency reserves. These sources commonly contain sediment, algae, and microorganisms. If you plan to use surface water regularly, budget for robust filtration and UV sterilization systems. For most beginners, surface water works best as a backup rather than a primary source.
Storage Solutions and Tank Sizing
Storage capacity is your system’s backbone. Without adequate tanks, you’re constantly vulnerable to supply interruptions. A dry week after depleting your reserve means no water until rain returns. Therefore, sizing your storage correctly prevents stress and ensures system reliability.
Calculating Storage Tank Size
Start by determining your household’s daily water consumption. Average American usage is 80-100 gallons per person daily, though off-grid lifestyles often reduce this to 50-60 gallons per person through conservation. A family of four might use 200-240 gallons daily. Multiply this by 14-28 days (two to four weeks) to get your minimum storage capacity.
Why 2-4 weeks? This buffer protects you during dry spells or when collection sources underperform. In regions with predictable seasonality, you might size tanks for your driest period. If you get no rain for 30 days in summer but abundant rain in spring, your storage needs reflect the longest expected gap. Understanding the real costs of going off-grid includes accounting for adequate water storage, so don’t undersize from the start.
Let’s work through an example: Family of four using 50 gallons per person daily equals 200 gallons total. For 21 days of storage, you need 4,200 gallons minimum. In practice, most beginners aim for 5,000-10,000 gallons when space and budget allow. This extra capacity handles unexpected droughts or system failures gracefully.
Tank Material and Installation
Water storage tanks come in several materials, each with advantages and limitations:
- Food-grade plastic tanks: Affordable ($1-3 per gallon), lightweight, UV-resistant, and easy to install. These are ideal for most beginners. Common sizes range from 55-gallon drums to 10,000-gallon cisterns.
- Fiberglass tanks: Durable and long-lasting (30+ years) but more expensive ($2-5 per gallon). Good for permanent installations where you plan to stay indefinitely.
- Concrete cisterns: Extremely durable and affordable if you build them yourself, but they require professional installation and can crack if not properly maintained.
- Metal tanks: Strong but prone to rust unless regularly maintained. Not recommended for long-term reliability.
For beginners, food-grade plastic tanks are the sweet spot. They’re affordable, simple to install, and widely available. Position tanks on a level, stable foundation with proper support underneath. Bury tanks partially or completely to protect from sunlight and temperature extremes. Sunlight promotes algae growth, and temperature swings stress tank materials over time. Aim for cool, dark storage—basements, buried chambers, or shaded structures work excellently.
Ensure your tanks remain food-safe. Never repurpose containers that held chemicals, pesticides, or toxic substances. Even small residues can contaminate your water supply. When purchasing used tanks, confirm their history and clean them thoroughly with food-safe methods before use.
Water Treatment and Purification
Water treatment separates casual off-grid systems from reliable ones. Even clean-looking water can harbor invisible pathogens—bacteria, viruses, and parasites that cause illness. Treatment removes sediment, kills microorganisms, improves taste, and ensures your family’s health and safety.
Multi-Stage Filtration
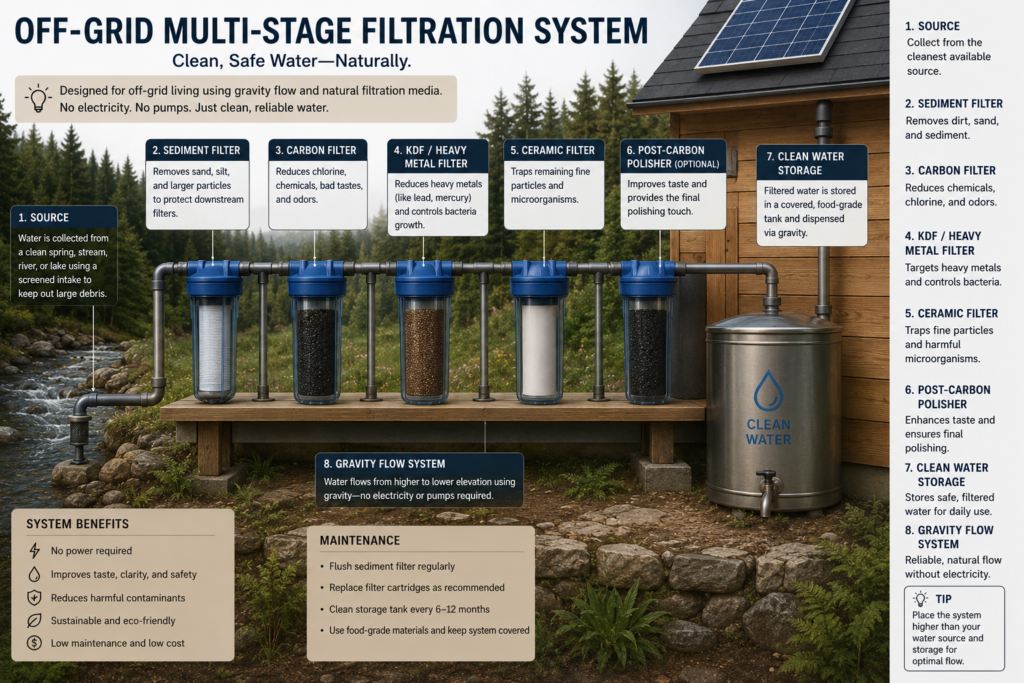
Most effective systems use multiple filtration stages working together. Think of it as defense-in-depth: if one stage lets contaminants through, others catch them.
The first stage removes large particles. A 20-micron sediment filter catches sand, silt, and organic debris. This protects downstream filters and equipment from clogging. You’ll replace these regularly—perhaps monthly or quarterly depending on water quality. Second stage filters use 5-micron cartridges to catch finer particles and some bacteria. Third stage uses activated carbon to remove chlorine, odors, and some chemical contaminants. These cartridges cost $15-40 each and need replacement every 6-12 months depending on usage.
For rainwater systems, a simple two or three-stage setup works well: sediment filter, activated carbon filter, and perhaps a fine 1-micron filter. For well water, you might add specialty filters targeting iron, sulfur, or hardness. The key is testing your water first to identify what needs filtering, then selecting appropriate cartridges rather than buying excessive filters you don’t need.
UV Sterilization and Other Methods
After mechanical filtration, you need to address microorganisms—bacteria and viruses that pass through physical filters. UV sterilization uses ultraviolet light to damage microorganism DNA, rendering them harmless. UV systems are effective, chemical-free, and require no consumable cartridges—just occasional cleaning of the UV lamp. A typical household UV unit costs $200-500 and uses modest electrical power.
Boiling is another reliable method, though energy-intensive for large volumes. Chlorine disinfection works well but requires careful dosing and leaves a chemical taste many find unpleasant. Ozone treatment is effective but requires special equipment. For most beginners, the combination of mechanical filtration plus UV sterilization provides excellent safety with minimal complexity.
Testing and Ongoing Monitoring
Water testing reveals what you’re actually dealing with. Ideally, test your source water before treatment to establish a baseline, then periodically test treated water to confirm your system works. Local health departments often perform basic testing affordably. Professional labs can run comprehensive tests for $150-400, identifying bacteria, viruses, minerals, and chemical contaminants. The EPA provides guidance on drinking water standards and testing, which helps you understand what safe levels look like.
Test at least once per year, plus anytime you notice taste, color, or odor changes. Some beginners invest in test kits they can use at home monthly for peace of mind. These basic kits run $20-50 and reveal bacterial growth or treatment system failures before they become serious. Knowing your water is safe provides enormous confidence in your system.
Distribution and Pressure Systems
After collecting, storing, and treating water, you need to deliver it reliably to your home. Distribution systems vary from simple gravity-fed setups to pumped systems with pressure tanks. Your choice depends on elevation differences, desired water pressure, and electricity availability.
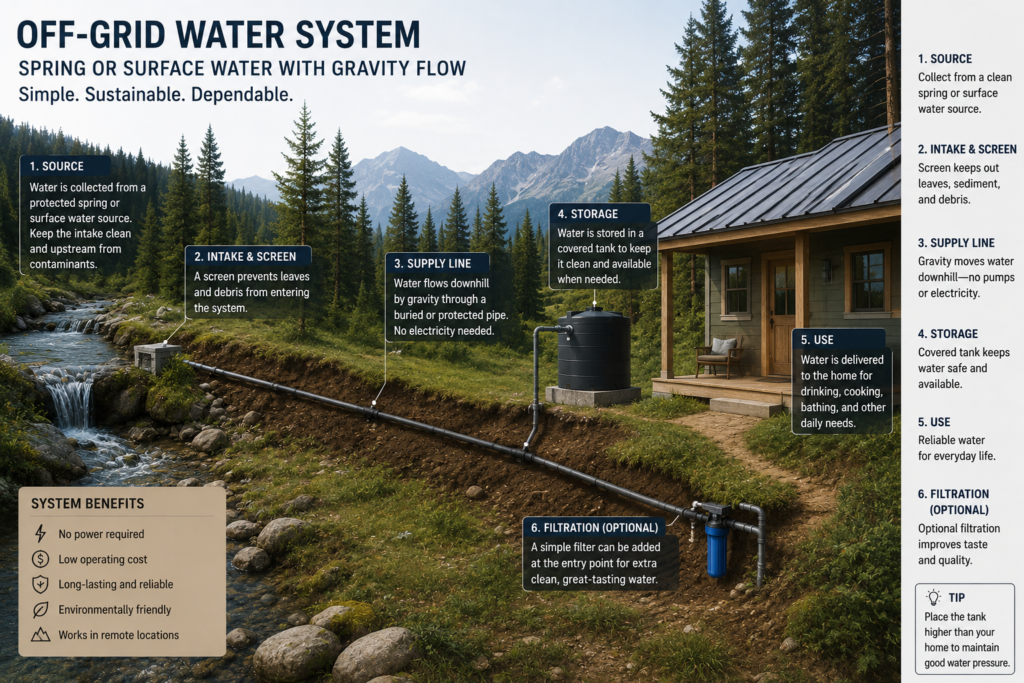
Gravity-Fed Systems
If your storage tank sits significantly higher than your home—at least 20-30 feet elevation difference—gravity naturally provides water pressure. Water in elevated tanks creates pressure proportional to the height difference. Each 2.31 feet of elevation provides approximately 1 pound per square inch (PSI) of pressure. Therefore, a tank 50 feet above your faucet provides roughly 22 PSI—enough for adequate household use.
Gravity-fed systems are beautiful in their simplicity. No pump, no electricity, no moving parts means fewer failures and maintenance. However, they require property layout that accommodates elevated storage, which doesn’t work everywhere. In flat terrain or where your tank sits below your home, you’ll need pumping systems instead.
Pump-Based Systems
A submersible pump pulls water from tanks or wells and pushes it to your home and pressure tank. Submersible pumps operate electrically and can handle depths of 25-300+ feet depending on the model. For most residential systems, a ½ to 1 horsepower pump handles household demand adequately.
The pump delivers water to a pressure tank—a vessel containing both water and compressed air. As the pump fills the tank, air compresses inside. When you open a faucet, pressurized air pushes water out. When pressure drops to a preset minimum, the pump cycles back on. This cycle prevents the pump from running constantly while maintaining consistent water pressure throughout your home.
Pressure tanks typically range from 20-120 gallons. A general rule is to size your pressure tank at 10% of your daily water consumption. Therefore, a household using 200 gallons daily works well with a 20-40 gallon pressure tank. This size minimizes pump cycling while remaining affordable and practical.
Plumbing and Winterization
Once water reaches your home, standard plumbing principles apply. Use food-safe PEX tubing or copper pipes—never use materials treated with chemicals. Insulate pipes in unheated areas to prevent freezing. In cold climates, heat tape or pipe insulation prevents water from freezing in winter, maintaining system operation year-round.
Winterization becomes critical in freezing climates. You might drain outdoor components when winter arrives and store them indoors. Alternatively, some homeowners bury outdoor pipes below the frost line to protect them naturally. Know your local frost line depth—typically 2-4 feet in northern regions.
Getting Started: Your First Steps
Ready to build your system? Start simple and expand gradually. Attempting everything at once overwhelms most beginners and stretches budgets thin. A phased approach lets you learn, troubleshoot, and improve systematically.
Phase 1: Assessment and Planning (Weeks 1-2)
Begin by assessing your property and local conditions. Walk your land during different seasons, noting water availability and elevation changes. Research your climate’s rainfall patterns, typical dry spells, and freezing periods. Visit local well drilling companies and ask about typical water depths and costs in your area. Talk to neighbors about their water systems—they’ll share what works and what didn’t.
Determine your water needs honestly. How many people will the system serve? Do you plan gardens or livestock? These factors significantly impact sizing. Calculate required storage capacity using the formula discussed earlier. Sketch your property, marking ideal tank and pump locations. Consider maintenance access—you’ll need to service filters, clean tanks, and potentially expand the system.
Finally, check local regulations. Some jurisdictions restrict rainwater harvesting or well drilling. understanding off-grid living laws and zoning requirements protects you from costly mistakes, and water systems are regulated in many areas. Verify requirements before building.
Phase 2: Start with Your Simplest Source (Months 1-2)
Choose your most accessible water source and begin there. If rainfall is reliable, install a simple rainwater system with one tank, gutters, and a basic sediment filter. If wells are common in your area and you have space, have a well drilled and tested. If you have natural springs, assess them professionally. Starting with one source lets you perfect the basics before adding complexity.
Build or purchase your storage tank. For most beginners, a food-grade plastic tank of appropriate size (2,000-5,000 gallons initially) works perfectly. Set it up on a level foundation, connect collection infrastructure, and monitor what actually collects. You’ll quickly learn your system’s real performance versus your predictions. Use initial months to adjust tank positioning, improve gutters, or modify collection methods based on what you observe.
Phase 3: Install Treatment and Distribution (Months 2-3)
Once collection is working, add treatment. Start with mechanical filtration—a simple sediment filter and activated carbon unit. Test your water to identify what else you need. Many systems work fine with just mechanical filtration if sources are relatively clean. Others require UV sterilization or additional stages based on test results.
For distribution, determine if gravity-fed systems work on your property. If yes, run pipes from your elevated tank to your home using gravity pressure. If no, install a pump and pressure tank. Budget roughly $500-1,500 for a basic electric pump setup, pressure tank, and plumbing to your home. This investment varies widely based on distance from tank to home and soil conditions for burial.
Test everything. Fill tanks and observe collection and distribution. Open faucets and check pressure. Refine positioning and connections. Many systems need tweaking in early months as real-world conditions reveal minor issues.
Phase 4: Expand and Redundancy (Months 3+)
After your primary system runs smoothly for several months, consider adding backup sources. Install a second collection method or a well as backup to rainwater. Add more storage capacity if droughts exceed your current system’s ability. Upgrade filtration if testing reveals contaminants. This phased approach prevents overwhelm and ensures you’re solving real problems rather than overthinking theoretical ones.
| System Component | Function | Cost Range (Basic) | Maintenance |
|---|---|---|---|
| Water Source (Gutters/Well) | Collects water from rain or ground | $200–$5,000 | Gutter cleaning, well testing |
| Storage Tank (5,000 gal) | Holds water for emergencies | $1,500–$3,000 | Annual cleaning, monitor for leaks |
| Filtration System | Removes particles and contaminants | $300–$800 | Replace cartridges every 6-12 months |
| UV Sterilizer | Kills bacteria and viruses | $200–$500 | Clean lamp annually, replace every 1-2 years |
| Pump & Pressure Tank | Delivers pressurized water to home | $700–$1,500 | Check monthly, service as needed |
| Plumbing & Winterization | Distributes water throughout home | $400–$1,000 | Annual inspection, insulate in winter |
A realistic first-year budget for a complete basic system ranges from $3,500-$10,000 depending on your property, water source accessibility, and component choices. Well drilling costs vary dramatically by region—some areas see wells for $1,500 while others cost $5,000+. Rainwater systems are typically cheaper initially but may require more storage capacity. This investment pays dividends in independence and freedom from utility bills over many years.
Build your off-grid water system one phase at a time. Start with your most accessible water source this month, add treatment within two months, and expand with backup systems as your confidence grows. Within a few months, you’ll have a functioning water system that makes you genuinely self-sufficient—and that’s when you’ll understand why people choose off-grid living despite its complexity.
Frequently Asked Questions
How much storage capacity do I actually need for off-grid water?
Most experts recommend storing water to cover 2-4 weeks of household consumption. For a family of four using 50 gallons per person daily (200 gallons total), you’d want 4,200-8,400 gallons minimum. This buffer protects you during dry spells or collection system failures. In regions with predictable dry seasons, size your tanks for the longest expected gap between rainfall or other collection events. Starting with 5,000-10,000 gallons of storage provides excellent security without being excessive.
What’s the minimum treatment needed to make water safe to drink?
At minimum, you need mechanical filtration (sediment filter) plus UV sterilization or boiling to kill pathogens. The combination of a 20-micron sediment filter followed by a 5-micron filter and activated carbon removes most particles and some contaminants, while UV sterilization handles bacteria and viruses. However, what’s “minimum” depends on your water source—well water might need less treatment than rainwater or surface water. Always test your source water first to identify specific contaminants, then design treatment accordingly rather than guessing.
Can gravity alone provide enough water pressure for my home?
Yes, if your storage tank sits at least 20-30 feet higher than your highest fixture. Every 2.31 feet of elevation difference provides approximately 1 PSI of pressure. A tank 50 feet above your home generates roughly 22 PSI—adequate for showers and appliances (which typically need 20-60 PSI). However, gravity-fed systems only work in specific property layouts. Flat terrain or tanks positioned below your home require electric pumps and pressure tanks for adequate water delivery.
How often should I test my off-grid water?
Test your water source before building your system to establish baseline quality and identify what treatment you need. After installation, professional testing once yearly maintains safety. Many homeowners also use monthly home test kits ($20-50) to monitor for bacterial growth or treatment system failures between professional tests. Test immediately anytime you notice changes in taste, color, odor, or clarity—these changes signal contamination that needs investigation. If your system uses septic systems or livestock nearby, testing should happen more frequently since contamination risks increase.
What happens to my water system when temperatures drop below freezing?
Freezing temperatures can burst pipes and damage system components. Protect exposed pipes with insulation or heat tape to maintain water flow. Bury outdoor pipes and tanks below your local frost line (typically 2-4 feet in northern climates) to protect them naturally. In very cold regions, you might drain outdoor components when winter arrives and store them indoors. Maintain at least minimal water circulation in winter—moving water resists freezing better than static water. Planning winterization before cold weather arrives prevents emergency disruptions when temperatures drop.


3 Comments on “Off-Grid Water System Setup for Beginners (Step-by-Step)”